Thursday 5 November 2009

Update to the latest ath9k drivers

I tested out the latest 2.6.31 linux kernel on a spare install of ubuntu i had on an old hard drive and noticed that my wifi signal using the ath9k driver had boosted to twice as strong as it was in my normal install of ubuntu that i have but i decided that i didnt want to update the full kernel in my normal install as this can be a bit of a tricky task and usually something gets messed up along the way, instead i just wanted to update to the latest ath9k driver and after a quick search i figured out this is how to do it.

Firstly install the required files to build the drivers.

$ sudo apt-get install build-essential linux-headers-`uname -r`


Now you need to download and extract the latest compat-wireless-2.6.tar.bz2 file from

http://wireless.kernel.org/en/users/Download

Now cd into the directory and build the driver

$ cd compat-wireless-2.6 && ./scripts/driver-select ath9k && make


Disconnect your wifi with whatever network manager you use and then carry on to install the driver.

$ sudo make install


Now unload the old drivers and modprobe for the new ones

$ sudo make unload && sudo modprobe ath9k


now you can reconnect with your network manager to your router and when you look at the signal strength hopefully you'll have gained the extra boost in signal that i gained thanks to the guys that work on the drivers.

NOTE: if modprobe on the last step doesnt work then just reboot the system and it will load the drivers for you.

If you want remove the new drivers and go back to using your old ones open a terminal and cd into the drivers folder you extracted and type

$ sudo make uninstall

Friday 9 October 2009

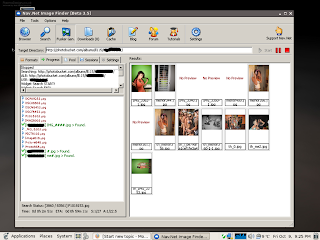
NavNet App Working On Hardy


NavNet App is a windows photo fuskering software to download pictures and videos from sites like myspace, photobucket etc, etc.
It can be used to gain access to peoples private photo & video albums when used with the correct wordlists, you can find out more info about it at its homepage here http://navnetapp.com

Until recently i have been unable to get this software working on linux through wine and couldnt find any tutorials or anyone else who had managed to get it working so i decided to have another try last night and to my amazement it worked.

The only problems are with the browser being to small to use and that you cannot minimize the window or the graphics on the app will crash but you can still use the Fusker Generator and everything else perfectly and to bypass the graphics crash dont minimize the apps window.

Here's How I Got It Working

1. Download Wine v1.1.30:

$ 1. Go here and download Wine v1.1.30 for your Distro and install it:
http://wine.budgetdedicated.com/archive/ubuntu/

make sure its v1.1.30 or else navnet wont work

2. Lock wine to stop it from upgrading when you upgrade your system:

$ sudo aptitude hold wine


3. Update database and install wine-gecko & cabextract:

$ sudo apt-get update && sudo apt-get install wine-gecko cabextract


4. Get winetricks & chmod it:

$ wget http://www.kegel.com/wine/winetricks && sudo chmod +rwx winetricks


5. Install dependancys:

$ ./winetricks mdac28 jet40 dotnet20


6. Download NavNet 3.5 or NavNet Beta v4.4.2:

for v3.5 use;

$ wget -c http://www.navnetapp.com/nvt/app/NavNetSetupB35.exe


or for v4.4.2 use;

$ wget -c http://www.navnetapp.com/nvt/app/NavNetSetupB442.exe


7. Install NavNet 3.5 or NavNet Beta v4.4.2:

for v3.5 use;

$ wine NavNetSetupB35.exe


or for v4.4.2 use;

$ wine NavNetSetupB442.exe


Then just run NavNet from the desktop icon and enjoy.

Thursday 10 September 2009

Connect Windows To Linux The Easy Way

This guides about a little piece of windows software but i feel its usefull for linux users too because if like me youv spent ages messing around with samba trying to allow your windows partition to see the files and folders in your linux partition and no matter how many guides you follow still cant get it to work then this is deffinetly for you.

The reason i want to be able to see my linux partition when im using windows is to transfer files back and forward without having to resort to my usb flash stick all the time, so heres the easy way to do it you just need to install a little program into windows called "Ext2 IFS". Once you install the program then click start, control panel and you'll notice a programe called IFS Drives, just open that program and it will show you all the drives on your PC, your linux drive should be the one thats marked with the Ext2 file system all you have to do is assign a drive letter to it from the drop down list and voila you can now see your linux partition when you go to "My Computer".

Please remember though that by doing this you could be allowing any viruses you have on you windows box access to your linux partition so be sure to change the drop down box in IFS Drives to none when you dont need access to you linux box.

Heres a download link for Ext2IFS
http://www.fs-driver.org/download/Ext2IFS_1_11a.exe

and heres the homepage for more info
http://www.fs-driver.org/

Saturday 6 June 2009

Install VirtualBox In Hardy

I recently switched back to using Hardy Heron because after upgrading to 9.04 jaunty i didnt have any sound on my pc, iv hit the same problem before when upgrading my kernel but as i didnt blog it i cant remember how i fixed it so just decided to go back to what works for me, the one thing that didnt work for me straight away in ubuntu 8.10 hardy was virtualbox so im blogging how i solved it to keep for future referencing.

Firstly install virtualbox from the repositories by opening the terminal and entering;

$ sudo apt-get install virtualbox


Ok all that went fine for me but then when i created a new virtual machine and tried to run it i got an error

VBox status code: -1908 (VERR_VM_DRIVER_NOT_INSTALLED).

so after a little searching i found the answer which was that you need to install modules for your kernel version, so back to the terminal again and enter;

$ uname -r


to find your kernel version, mines was;
2.6.24-24-generic

so in the terminal i just entered;

$ sudo apt-get install virtualbox-ose-modules-2.6.24-24-generic


(You need to change the kernal numbers at the end to match your output from your uname -r command)

Then restart virtualbox backend with the commands;

$ sudo /etc/init.d/vboxdrv restart && sudo /etc/init.d/virtualbox-ose restart


Then at the top of your desktop go to
System >> Administration >> Users and Groups
click unlock then manage groups and scroll all the way down near the bottom where youll see a group called vboxusers click properties and make sure your username has a tick beside it and click OK.

Now you just need to reboot the pc and virtualbox should be running perfect for you to install any other OS's inside your ubuntu.

Friday 5 June 2009

Loads of nautilus scripts

A nautilus script is a bash script that when placed in a special nautilus scripts directory will add extra menu items to the right click menu under scripts when you are using the nautilus file manager.

open up a terminal and type;

$ cd ~/.gnome2/nautilus-scripts && wget http://g-scripts.sourceforge.net/nautilus-scripts.tar.gz && tar zxvf nautilus-scripts.tar.gz && rm nautilus-scripts.tar.gz


and thats you done.

You can see the scripts by right-clicking on you desktop and go to scripts, nautilis scripts, to see the full list of scripts youv just added.

Saturday 9 May 2009

Convert Video To An Mp3 Audio File

Heres how to convert a video file to an audio mp3, first open a terminal and install ffmpeg

$ sudo apt-get install ffmpeg


now cd in the terminal to the folder your video file that you want to convert is in then simply enter

$ ffmpeg -i YourVideoFile.flv -ab 160k -ac 2 -ar 44100 -vn YourAudioFile.mp3


and wait for it to convert :) yep it really is that simple.

the -i simply means your input file, the -ab indicates the bit rate, -vn means no video ouput, -ac 2 means 2 channels and the -ar 44100 indicates the sampling frequency.

You can edit these to suit your needs

Wednesday 17 December 2008

Transfer files to and from your nokia in ubuntu

Transfering files to and from your nokia phone is easy under linux if you use the correct tools, im going to show you how to do it using obexftp, obexftp-frontend, DKU-2 cable and my old Nokia 7600, this will work with any Nokia phone it doesnt have to be a 7600, You could also transfer files by mounting your phones system onto your hard drive but ill leave that for another blog :)

OK firstly we need to get the tools so fire up the terminal and enter;

$ sudo apt-get install obexftp openobex-apps


now we could use just these tools to transfer our files but whats the point in that when theres a nice GUI frontend available for obexftp.
You need to have java runtime installed to run the GUI so if you have java installed then skip the next step and if you havent got java installed then install it now by going to the command line and entering;

$ sudo apt-get install sun-java6-jre sun-java6-bin


Now well download the obexftp-frontend, its not available in the repositories but you can download extract and move it to your /home directory by entering;

$ wget -c http://kent.dl.sourceforge.net/sourceforge/obexftpfrontend/obexftp-frontend-0.6.1-bin.zip && unzip obexftp-frontend-0.6.1-bin.zip && sudo cp -r obexftp-frontend-0.6.1-bin /home


Now we need to set our permissions to allow us to access and transfer files to and from our phone, go to the terminal and enter;

$ lsusb


and we should see a line similar to;


Bus 004 Device 002: ID 0421:0400 Nokia Mobile Phones 7600 Phone Parent


Now iv marked the important numbers above in red, the first number is the;
VendorID: 0421
and the second number is the;
ProductID: 0400

Your numbers will differ slightly but just remember that the first is the VendorID and the second is the ProductID.

Now in the terminal enter;

$ sudo gedit /etc/udev/rules.d/40-permissions.rules


and add the following to the end of the file that opens;

BUS=="usb", SYSFS{idVendor}=="VendorID", SYSFS{idProduct}=="ProductID", GROUP="plugdev", USER="yourUserName"


replacing VendorID and ProductID for your actual id numbers from before and put your own username where it says yourUserName and save, for example mines looks like this;
BUS=="usb", SYSFS{idVendor}=="0421", SYSFS{idProduct}=="0400", GROUP="plugdev", USER="mark"

Now we're almost finished just right click on the desktop and select "create launcher", name the launcher whatever you want and in the "command field" type;

java -jar /home/obexftp-frontend-0.6.1-bin/OBEXFTPFrontend.jar


Now all you need to do is click on the launcher you just created and it will open the ObexFTP-frontend for you to configure and the last step are to add;

/usr/bin/obexftp


where it asks for the ObexFTP Path:
Change Transport to USB and set Value to 1 then press Test connection and thats you done, you can now just use the launcher to start transfering files to and from your mobile phone.